Recipe: Homemade Linseed and Sunflower Seed Bread

But for those of you who still have proper and REAL ovens, bake away! One of my favourite breads from Artisan Bread in Five Minutes A Day is not in the book. It's my own experiment at customising the basic recipe that worked!
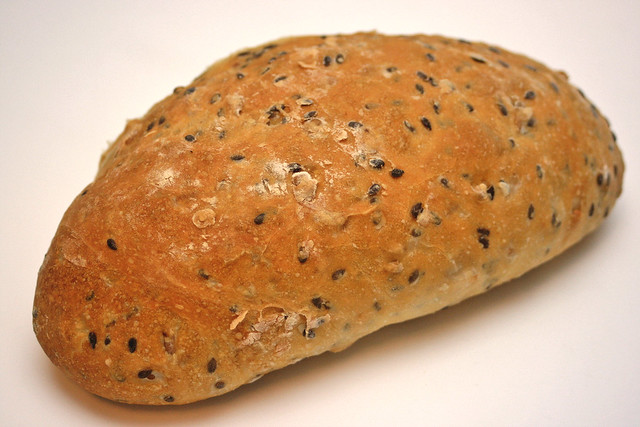
Linseed and Sunflower Seed Bread. Nothing too complicated really. I just added half a cup of linseed and sunflower seeds to the basic boule recipe.
It's like a rustic bread with nutty flavours but not too heavily "multigrain". We just couldn't stop eating this. I almost like this better than the Sundried Tomato and Cheese Bread I showed you earlier.
This recipe is enough for four 1-pound loaves, but you can halve or double it easily:
3 cups lukewarm water
1.5 tbsp granulated yeast (I use instant)
1.5 tbsp kosher or other coarse salt
6.5 cups unsifted, all-purpose flour
Half cup linseed (available from Cold Storage or organic stores)
Half cup sunflower seeds (deshelled, of course)
Cornmeal for dusting (optional)
Rolled oats for topping (optional)
METHOD
- Make sure water is slightly warmer than body temperature. This helps initial rise to be just 2hrs instead of 3 or 4.
- Add yeast and salt to the water in a 5-quart/litre bowl or plastic food container. Don't worry about dissolving it.
- Mix in the flour - no kneading necessary. Dough should be uniformly moist.
- Cover with lid (not airtight) and allow to rise (about 2hrs). Longer periods are OK too.
- You can use a portion of the dough after this, but fully refrigerated dough is less sticky and easier to shape.
On baking day...
- Dust the surface of the dough in the container with flour and cut off about a grapefruit size. Dust the piece with more flour and quickly shape it into a ball (stretch surface of dough around to the bottom on all four sides, rotating as you go). You can make little rolls too if you like.
- Allow to rest an hour. The book calls for a pizza peel and baking stone (hence the cornmeal for dusting the pizza peel), but it's fine to just use a parchment-lined baking tray.
- Preheat your oven 20 minutes before baking to 450°F/230°C
- Before placing the bread (on baking tray) into the oven, you can scatter some flour onto the bread for a nice flour-dusted effect. And you can use a serrated knife to make some slashes (lines or cross) for patterns. Totally optional.
- Pour one cup of hot water into a small tray or metal container and put that into the oven as well (but note that tabletop ovens may not be able to handle this extra steaming). I put it on the oven floor, which I was recently told is not advisable (try the lowest rack instead). Or you can use a broiler tray that does not interfere with rising of bread.
- Bake for 30-35 minutes or until deeply browned and firm.
- Allow to cool before slicing or eating. Yes, we all want to carve right into warm bread fresh out of the oven, but let it cool first, or the inside may still be partly gummy.
How I love the crispy crust! Even if it ruined my oven.
Now does anyone have a spare oven just lying around, unused, and won't be missed?


Mmm.....yummy! I also love crispy crust. That look delicious. I can't make something by looking at the recipe. Can't understand recipe language. I can only learn with both, practical & teory. haha... guess I have to see you do it before I try my hand on it.:D
ReplyDeleteThese buns look really great and the crispy crust is yummy! Have a great day!
ReplyDeletehi,
ReplyDeletejust came across your blog and thought i'll drop a note in case it helps you. when i first started bakign breads with my rowenta counter top oven (a very good one for such ovens), i also damaged it with, i suspect, DIY steaming methods. It threw the thermostat out of whack so the oven would not heat up properly. I think you can get thermostats reset for not too much, but i decided against it as i already wanted to get a proper oven. But it was left there as an emergency oven. To my surprise, after a while it started functioning as normal!
i don't know what the problem with your oven is, but just in case this helps. Also, as i discovered later on, one should not place anything on the oven floor. Use the lowest level possible but avoid the oven floor itself.
Hello! I've been using the no-knead bread recipe and part of getting a really great crust is baking it in a cast iron pot. You can hear the break crackle when it is cooling! Maybe you can try that with your next loaf.
ReplyDeleteMun: Yes, it helps to have someone demo it for you when you're learning first time. I wish we could try making some! It'll be fun!
ReplyDeleteHi Katarina, thanks! The crust is yummy indeed!
Anonymous: hey, mine's a Rowenta too! Yes, it was quite good for many things. But I think I ruined it pretty badly somehow - it short-circuited the house a couple of times, so we don't dare switch it on anymore. Hopefully just a fuse blown, but I did see some smoke coming out. Ah thanks for the tip on not putting things on the oven floor. I shall amend that bit in my posts.
Joone: Ooh, I love the no-knead bread recipe too, but have no cast iron pot (I used a Pyrex bowl back in 2007, which worked too, but probably not as brilliantly).
I am giving this a go! Thank you for a yummy easy recipe and much bless, all great things are possible!
ReplyDelete